     _________
    /````````_\                  S N I F ~ e2e TLS trust for IoT
   /\     , / O\      ___
  | |     | \__|_____/  o\       e2e TLS SNI Forwarder
  | |     |  ``/`````\___/       e2e TLS CA Proxy
  | |     | . | <"""""""~~
  |  \___/ ``  \________/        https://snif.host
   \  '''  ``` /````````         (C) 2021-2026 VESvault Corp
    \_________/
                                 https://github.com/vesvault/snif
See it work in your browser, right now. No account, no install — solve
a quick challenge and this tab earns a real, publicly-trusted TLS certificate for a
*.snif.xyz hostname, then turns into a live HTTPS server you can open
from your phone. The SNIF relay only ever sees ciphertext.
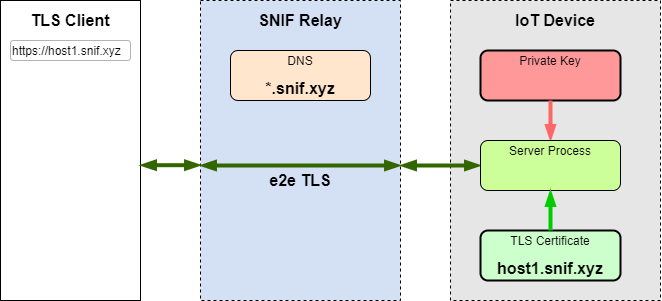
SNIF lets any app on any device — even one behind NAT, with no public IP and no open inbound ports — accept ordinary, publicly-trusted TLS connections under its own unique hostname. A designated SNIF relay routes the encrypted traffic by its SNI record without ever holding the session keys, so it cannot intercept, monitor, or read the private communication.
Because the TLS session terminates inside the device's own connector, the trust is genuinely end-to-end: a client connects to the SNIF hostname exactly as it would to any trusted public server, with no middle-man able to read a byte. In effect SNIF becomes a peer-to-peer, app-level VPN secured with public-trust certificates.
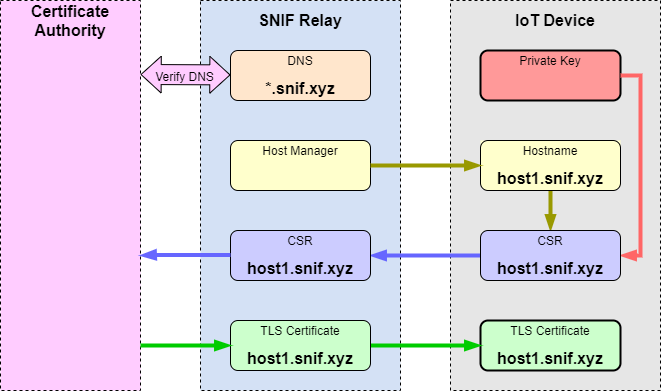
The private key is generated locally by the SNIF connector and never leaves the device.
The connector sends a CSR to the CA proxy on the SNIF relay server. The proxy acquires an X.509 certificate and feeds it back to the device.
Having the certificate and the private key, the connector is now capable of terminating TLS traffic. Incoming TLS connections to the device's hostname come to the SNIF relay, which uses SNI record to identify the destination device and forward the TLS TCP socket traffic through the matching connector.
An IoT device can run snifd connector as a separate process that forwards incoming TLS connections to local ports, either unsecure TCP with TLS being terminated by snifd, or TLS being terminated by the listening app using the certificate and the private key shared with snifd.
In more advanced setups SNIF connector can be integrated directly with the app that serves incoming connections on the device.
From the client's point of view, a TLS connection to the hostname of the SNIF enabled device or app works same way as a TLS connection to a trusted server.
Any potential attempts of malicious actions by any SNIF relay are easily detectable through the public TLS certificate records.
To avoid public exposure of the unique SNIF hostname through the public CA records, the CA proxy can issue a wildcard certificate to a unique subdomain. The actual hostname will be a specific host within the certificate's subdomain that is not listed on the public records.
./configure
make
sudo make install

# Review settings in /etc/snif/snif.conf, edit the port mapping and other
# variables if necessary. The configuration defaults to the public SNIF
# Relay by VESvault, see https://snif.host#snif-pub.

snif-conn

# Follow the link the command outputs to authorize the certificate issuance

snif-conn

# Once authorization is complete, the command outputs the SNIF host name
# permanently assigned to this Connector.

# Configure the system to automatically launch snif-conn as a daemon with
# the argument '-d'. A systemd service file is included in this package, and
# is automatically installed in /lib/systemd/system if this path is available

systemctl enable snif-conn
systemctl start snif-conn

# Configure local TLS services mapped to SNIF ports to use the SNIF
# certificate and private key - /etc/snif/snif.crt, /etc/snif/snif.key
# For non-root processes, add the uid to group 'snif' to enable access
# to the files.

# Test the SNIF connection - check https://{snif_host_name}
# assuming that SNIF port 443 is mapped to the https server running on the
# device.
See ca-proxy/README for instructions
Use lib/cert.h to allocate the SNIF hostname, generate the private key, issue and renew the certificate.
Establish a SNIF Control Connection to {snif_host_name} on TCP port "snif" (7123).
Use lib/conn.h to receive and send SNIF messages over the control connection and to manage service connections.